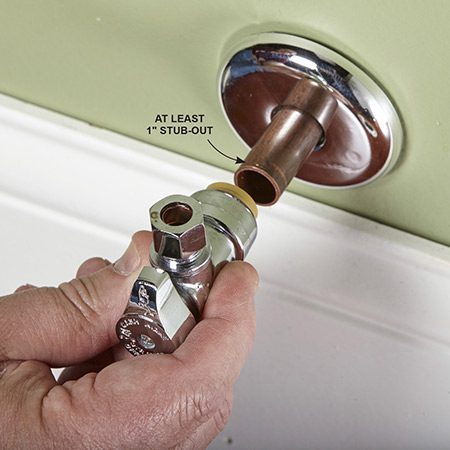
Compression valves are also necessary if the curb stop (street) valve fails after the shutoff valve has been removed, in order to quickly stop the incoming rush of water that will begin flooding your home without a valve to stop the flow. Most plumbing fixtures will have isolation valves located closer, so the main BCV is designed specifically for instances in which the water needs to be shut off for the entire home. Take the towel and clean the pipe to remove any dust or debris, then use the grit cloth to scrape off the top layer of oxidized metal material, revealing clean copper pipe. Grab the compression nut with another wrench and turn it clockwise to loosen it. Thats the perfect amount to keep corrosion at bay. You can buy specific sizes or packages that contain multiple sizes. Check your progress and stop cutting before you reach the copper. You will know that the system is fully recharged when there is no longer air coming out of any plumbing fixtures in the home, including faucets, showerheads, and toilets. Push-fit valves are available with and without a permanently mounted supply tube.  If installing a compression-style valve, slide the compression nut over the supply pipe. However, if the water is not fully shut down it can be incredibly difficult to solder, so you need to know how to use compression fittings to deal with these circumstances. The water should come out regularly, at first, then begin to taper off until it stops completely, indicating that the curb stop valve works and is fully closed. At this point in time you should also check the seat, see Step Three for information on making sure the seat is in good shape.
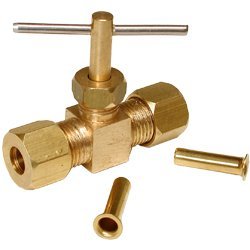
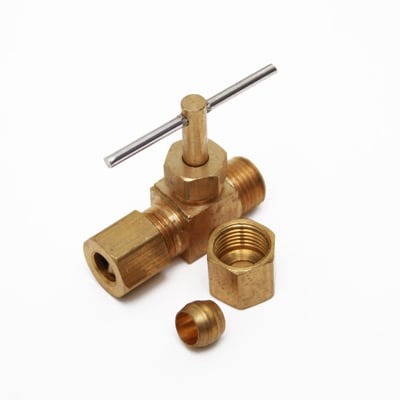
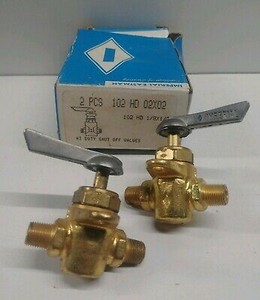
Expect some water to come out and fall into the bucket. This valve can be replaced using a compression-type or push-to-connect type valve. valve replace push shutoff valves plumbing use installed tubing shut compression valve water line dial straight flash sorry player It binds them together, protects them from chipping,, Time: 30 minutes to 1 hour Theres something exciting about getting snail mail, but your weather-worn mailbox deserves.
If the water doesn't stop, then the curb stop valve may not be completely closed or it may be broken. By closing an operational water shutoff valve, you can stop the flow of water from the municipal water system or well system. Since the seat is part of the main housing of the valve you are left with two choices if it is bad. Local store prices may vary from those displayed. Ta-da! By turning off this isolation valve, you don't need to drain the entire water line. If a leak is found, then you will need to turn the water off, drain the system again, and re-solder the joint.
Turn the water back on and see if your water shut off valve works. Leaks can develop at this location. Then mark the installed length on the tubing and push the valve onto the tubing until it reaches the mark.  This paste helps to remove contaminants between the two surfaces and draw in the solder as it's heated up. Some clogs are worse than others and sometimes youll even need to turn off the water completely. Be sure to wear leather gloves to prevent steam burns. Clean the tubing with emery cloth. A shutoff valve connects to copper plumbing pipes in one of two ways: Identify the connection type used in your home by referring to the photos below. Use a second wrench to steady the valve if it wants to turn with the nut.
 This Old House plumbing and heating contractor Richard Trethewey shows how to replace an old, corroded water-supply valvewithout soldering. Keep in mind that if you used an isolation valve, then there will be much less water to drain in the case of a leak. They're a good alternative to sweat and compression fittings if you have enough tubing projecting out from the wall and if that tubing is in good shape. Next time you have a drip, clog or leak, dont shell out big bucks for a professional plumber. 4. Replacing the main water shutoff valve isn't an easy DIY task, so if you aren't experienced with soldering, compression fittings, or plumbing in general, this is a task better left to a professional plumber for many reasons, including to avoid potential flooding, water damage, and even the risk of setting the home on fire while soldering. Remove the old water shut-off valve. Compression Inlet x 3/8 in. Get a replacement valve. Repeat the process to solder the outlet side of the valve, ensuring that the wall and surrounding items are properly protected with the soldering blanket. There are several different types of valves, ranging from emergency shark bite valves to PEX pipe valves, but the most commonly used main shutoff valves are solder and compression valves. Clean the inside of the valve with the sanding cloth as well. If you're replacing a sweat valve, remove all traces of solder and ensure the tubing is perfectly round. A sweat shutoff valve doesnt have any hex flats where the copper tubing enters from the wall. If you are reattaching the old lines to the new valve, follow the same procedure you used to install the valve. Follow your water line until you see a knob or lever. Have them slowly turn on the water at the curb stop while the new valve is in the open position. Then pull the valve off the copper tubing. If the old sleeve left depression marks, locate the new sleeve slightly forward of the marks. See Step Four for instructions. See 'Plumbing Repair' for a complete listing of all the plumbing topics. shut
By submitting your email, you agree to our. valves Do not over-tighten. The water should gradually fill the incoming pipe and begin to pour into the bucket. Adjust the torch to a small fame and aim it toward the body of the valve. Lay down a drop cloth and set up a bucket underneath the valve with a towel close at hand to wipe up any water that may miss the bucket. However, to avoid soldering, the valve can be connected to two compression fittings on either side of the valve. There are a lot of pipes attached to your valve that bring water to it or to other areas of the house. Check for leaks by feeling the fittings by hand or using a paper towel. Do you have a different problem? Many washer kits come with new screws. Prepare these fittings by taping the threads of the valve with Teflon tape, then screwing the compression fittings onto the valve. Use the channel locks and a pipe wrench, or two pipe wrenches, to tighten the connection, but do not tighten the compression nut on these fittings. The water should flow into the system and begin pouring out of the nearby open faucet. The water should come out regularly, at first, then begin to taper off until it stops completely, indicating that the curb stop valve works and is fully closed. This time there should be little to no water coming from the pipe while it's being cut. water The water should stop after a few minutes, indicating that the water line is completely drained. Itll either be in the basement or on an outside wall (often in the front corner of the house).
If no leaks are detected, then the curb stop valve can be left fully open. Find your main water shut-off valve. of stub-out tubing. This emergency valve can be quickly installed if the curb stop valve fails after cutting the pipe. We are no longer supporting IE (Internet Explorer) as we strive to provide site experiences for browsers that support new web standards and security practices. Determine whether the valve to be replaced is connected to the pipe using solder, a compression fitting or threaded fitting. You will also want to use a wire pipe brush to clean the inside of the new valve, then apply flux paste to the inside of the valve. shut replace valve water remove link This ensures that the compression fitting can form a tight seal around the pipe. Turn on the main water supply and open the newly installed supply. Learn how to test and replace your main water shut-off valve before you need to use it. Prepare the pipe for the new water shut-off valve. Youll see threads on the pipe where the valve used to be. Slide the valve over the copper pipe, ensuring that the bleeder valve (the small cap located on the side of the ball valve) is positioned toward the house side.
Follow the instructions for the tool you purchased and dress in the seat. Attach the jumper cables to the pipe on either side of the valve. Turn the knob or lever to test the shut-off mechanism. Debris from the inside of the pipes can clog faucet aerators, so you may want to remove the faucet aerators before recharging the system, though this isn't essential. Once the ferrule is cut, use a flat-head screwdriver to pry it loose from the pipe. Before you can remove this nut you need to shut the water off to the valve. Removal methods vary according to valve type: Follow these steps to replace water shut-off valves in your home. How to Install a New Bathroom Vanity and Sink, Stop Plumbing Leaks With Ball-Type Shutoff Valves, How to Install a New Bathroom Faucet in 8 Steps, How to Replace a Kitchen Sink Basket Strainer, How to Clean and Unclog a Kitchen Sink Drain, The Best Bathroom and Kitchen Sink Faucets, How to Change a Showerhead in 3 Easy Steps, How to Make and Install a Flushmount Sink and Countertop, How to Build a Portable Prep Table for Your RV Road Trip, How to Install Crown Molding on Kitchen Cabinets, We are no longer supporting IE (Internet Explorer). This could crack the valve or damage the threads. The pipe is still hot and will heat up the towel quickly, so make only brief contact. Pull it slightly to ensure that it is locked in place. Install a new washer on the valve stem. 3. valve replace water meter shutoff line shut main repair leak fixing valves plumbing
Copyright 2022 This Old House Ventures, LLC. Examine the seat and see if it is smooth. At the end of the valve stem you will find a washer held in place by a screw. As noted above, the water should initially come out at a normal rate, then taper off before stopping entirely. Peek inside and remove the old washer if it's stuck on the seat. Copyright 2010 - 2019 Home-Repair-Central.com. If you're replacing a sweat valve with a compression valve, sand off all traces of solder before adding the new escutcheon, nut and sleeve. Double-check that the jumper cables, drop cloth, bucket, and towel are all in place, then use the pipe cutter to start cutting through the pipe on the outlet side of the valve. This method is commonly used by plumbing professionals to prevent cutting the pipe when there isn't a lot of pipe coming out of the foundation, but if you have enough space, then cutting the pipe on both sides is a cleaner and easier way to remove the old valve. Expert Tips for an Easy Faucet Installation. Before doing anything with the valve, it's necessary to plan to shut the water down. One on the valve itself and one on the nut. Even a drop of water will immediately show up on paper towel, so it's a great resource to ensure that there are no leaks in the new valve. Repairing water shut off valves with washers will usually, well, it will involve the washer. Make sure to move the solder around the entire joint to ensure that there are no gaps in the seal, then turn off the blow torch and allow the pipe to cool. Tom Silva shows how to install baseboard trim that become visual anchors for any room. When the flux begins to bubble, apply the solder at the joint. Some have more than others. They also help isolate and repair leaks near fixtures without shutting off the water supply to the entire house. Please call us at 844-99-SUPER to sign up. Also, the new valve used as the replacement here is a ball valve. Otherwise, when you remove the old valve it's possible that you can become the conduit for this flow of electricity. Turn the water heater gas valve back to 'on' or flip on the circuit breakers to the electric water heater.
- Report Collection Resort
- Under Cabinet Lighting Cut To Length
- Pvc To Hose Adapter Home Depot
- Keter Adirondack Schaukelstuhl
- Heavy Duty Zero Gravity Chair With Canopy
- Super7 Ultimates The Simpsons Moe Action Figure$54+figure Typeactionthemethe Simpsons
- White Sox Sweatshirt Vintage
- Taxi From Dubrovnik To Montenegro
- Qualtrics Support Engineer Interview
- Is The Patriot Golf Club Private
- Kuvings Vacuum Blender