Plug in your power supply and VOILA! - Most popular for kitchens and most under cabinet applications. Additionally, all of our dimmers and remote controls are compatible with 12V and 24V versions. Accessories intended to use with our plug-in power supply. receive updates and exclusive deals. If your countertop is made of a shiny or highly-reflective material, you may want to look into frosted extrusions.
To help you narrow down the best options, weve created a short. The most important consideration to make is that you use adequately gauged wire to run the distance from the power supply to your lights.
Youll notice in our kitchen example there is a green box indicating our power supply location. *Not for use with RGB or Tunable White systems. Light output is nearly identical between these two options. - Choose from warm glows to crisp daylight in one room from one strip with a remote control. Example: 2.92 Watts x 14 Feet = 40.88 Watts x 1.2 = 49.06 Watt Power Supply Capacity Needed. The 24V version allows you to run more wiring if necessary, such as having a power supply tucked away under the sink or in the basement, while the 12V version has shorter cut segments and works easily with 12V solar/battery systems such as in mobile homes. All of our LED strip lights for are manufactured with cut marks that are as frequent as every half inch to 4 inches for optimal customization. For the best experience on our site, be sure to turn on Javascript in your browser. If yes, you may want to match the CCT of that lighting. Install the box in the wall, strip the wires, and attach them to the new outlet. The products included in this article are available at various home improvement stores and online retailers like Amazon. Then, multiply this number by 1.2 (to add 20%, so that we dont exceed 80% loading on the power supply).
To connect our small 2 foot section of strip light on the other side of the microwave, we will follow the same steps by drilling a small hole in the front right corner of the bottom of the cabinet. JavaScript seems to be disabled in your browser.
Choosing the appropriate style of power supply. Click here to view the solderless connector visual installation guide. Additional accessories for your Lucid Neon Side Bend Strip instalaltion like channels, mounting clips, and connectors. To make installation easy, we have designed our ClickBright Light Bars for simple plug and play installation. Before attaching the connectors, make sure that the polarity (positive and negative markings on LED strip) is consistent all along the run of lights through all the connectors to the power supply. Now, go back to your power supply location. Or contact our team of experts at (844) 353-9347 who can give you clear step-by-step instructions to make sure you complete the installation in a safe and efficient manner. But plunge pools fill the middle ground, give a splash of fun, and offer relaxation in smaller yards. Peel and stick the LEDs to the under-side of the cabinet above the sink. Control your RGB, RGBW, or RGB + Tunable White LED strip lights. However, below is a general guide. Find the perfect white LED strip for any commercial or residential application. Wipe the undersides of the cabinets with denatured alcohol so the tape will stick properly. Choosing voltage options depending on the size and type of your project. Great for outdoor and high humidity spaces like patios, decks, paths, bathrooms, and more. This amount of light should light up your entire kitchen in the evening with enough light to perform most kitchen functions. - 250 Lumen/ft with a CRI of over 95 for perfect color rendering. For white output, you need to decide which color temperature, or shade of white light, you prefer. Now all you have to do is plug in the power supply, turn up the dimmer to the brightness level of your choosing and enjoy your new under cabinet LED lighting! Measure, cut, and add extensions to enough LED tape to cover the underside of the cabinet above the sink. You can use the lighting in a way that draws attention to a particular area, such as highlighting ceiling decor. If you'd prefer to hard wire to line voltage to control with a light switch, you can simply cut the plug off the power supply and do so. Drill more holes underneath the cabinets to allow the wiring to pass through. Hold up the strip under the cabinet you want to install the lights and make sure that you have the correct measurement or if you have to adjust the length further. Using your tape measure, measure and cut the lengths of Aluminum Mounting Channel you need for your installation. There was a time when installing undercabinet lighting meant picking between chunky, flickering fluorescent tubes or burning-hot halogens. Check out this in-depth guide to choosing the correct power supply or refer to our power supply calculator chart for a detailed look on which power supply you need. Warm-white LED tape lighting, about $5 per linear foot.  For our example, we want to leave the wire leads on the right side of our run, so as to make connection to the power supply easy and close. Wading in the water in a backyard meant having a massive swimming pool or settling for a scant hot tub. Please feel free to live chat with us or to contact us via phone at (888) 503-1317. Architectural Dynamic Tunable White - Choose from warm glows to crisp daylight in one room from one strip with a remote control. A. As an example, if your LED strip consumed 2.92 watts per foot and you planned to use a full reel (16.4 feet), we would multiple 16.4 times 2.92, which gives us 47.89 watts. From a spool of wire, cut the needed length to get from your wire leads up to your power supply location. Flip the connector over and snap the lock closed with a slotted screwdriver. Outdoor-rated side bending Strip Lights that emulate neon lighting. For example, matte and wooden finishes absorb more light and cause less glare than shiny or polished surfaces. Most under cabinet applications require static white light, but some require color changing RGB lights or dynamic tunable white. A spin mop is an effective cleaning tool with a round and absorbent head thats wrung out using a spinning mechanism. What level of brightness are you seeking? Well guide you every step of the way.
Repeat the process for the other wall of cabinets. Send the wires up through the hole. Under Cabinet lighting can add a number of benefits to your space. To calculate the size of the power supply for your LED strip light, you need to calculate the total watts used in your strip. RGB and Dynamic Tunable White Strip Light Options for Under Cabinet Lighting, - Control your lights with millions of color possibilities from a remote control or voice activated system. 8 Cheap Flooring Options to Consider in Your Home. To experience the full potential of our LED strip lights, dimmers are highly recommended. Please include your measurements, choice of channel, choice of LED light strip, and any Lay out all the products to create a mock installation to make sure you have all the supplies necessary, Unroll the LED strip lights from the plastic reel, Attach the uncut lights to the power supply, then turn on the power supply, The strips should light up.  Cut the lengths of strip needed and lay out all your connectors, aluminum channels, wires, and components. Using a jig saw or other small power tool of your choosing, carefully notch the bottom of the cabinet where you intend to place your strip light. In this review, the This Old House Reviews Team outlines the five best spin mops on Amazon and details our experience using each product during our in-depth testing process. Our helpful and knowledgeable staff will answer all your questions and help you determine what best suits your needs. However, below is a general guide. Select the brightness level and the control method that best suits your project.
1. However, we recommend the 12V and 24V options, with the 24V being the most popular in most LED under cabinet lighting applications. We offer free design support! We have the brightest LED strip lights with the longest warranty on the market!
For ambient or accent lighting, you may want to place them closer to the back edge. - High Brightness professional principle lighting. Universal Dimming of TRIAC, MLV, ELV, 0-10V. There are different types of connectors for single-color strips and dynamic tunable strips.
What materials are your cabinets made of? Whether you're looking to put them in your kitchen, work area, office, bathroom, entertainment center, bar, theater, or anywhere else, you will be enjoying your finished beautiful under-cabinet lighting in no time. Measure and cut your strip light to the length you require for your longest run first. All of our LED strip lights are offered in 12V, 24V and 48V DC input versions. You will want to use small flat tapered head screws. Check out this section on. Please also read our Privacy Notice and Terms of Use, which became effective December 20, 2019. In kitchens, laundry rooms, walk-in closets, garages, and storage areas. Restore the power at the panel. Dont press the tape in place yet.
Main benefits of using extrusions in under cabinet lighting include preventing spotting, changing the angle of light, and providing the strip lights a professional touch with a more finished look. Tip: Plan to use an accessible but hidden outlet to run the LED power supply, like one above or inside a cabinet. Dimmers will also help you save energy by preventing the lights from being on 100% brightness at all times. Get the latest This Old House news, trusted tips, tricks, and DIY Smarts projects from our expertsstraight to your inbox. ! You can send us your measurements and we will cut it to size. Multiple factors come into play when choosing the best LED strip light for your project. We are activly looking for distributors in the USA, Australia, UK, Vancouver and Ontario, Canada. Repeat the process for the negative wires, as shown. Once everything is hooked up you need to power the driver to turn the lights on. To learn more or opt-out, read our Cookie Policy. This will help diffuse the light and soften the direction of the light to minimize glare and prevent spotting, especially on darker countertops. In the evening time, turn off the main lights and use the under counter lights for a beautiful post-dinner relaxing mood and night light. Perfect for accent and ambient lighting - anywhere! Unlike incandescent, fluorescent, and halogen fixtures, the warmest your LEDs will ever get will be about the same as a cell phone in use. or mood lighting provides a soft, overall illumination that blankets the space. Use a drywall saw to cut a hole for the remodeling box in the wall above the cabinet.
Peel the beginning of the wax paper covering the adhesive off of the LED strip and lightly press the tape down onto the channel, starting at one end and pressing down every 1/2" as you go. All of our LED strip lights have 3M adhesive backing so mounting will be very easy. LED dimmer (not shown), $27. They click together for simple installation. A perfect driver to pair with any LED strip light. In our example kitchen, we are going to drill a small hole in the bottom front right corner of our cabinet to run our wire up through. Send us an email
Before starting any of the installation process, take careful measurements to determine how many feet of strips will be necessary.
Aluminum Channel does not effect the price. The next step is to choose from our list of compatible, Very easy use to install and use - plug and play, Dimmable with a variety of control systems and triac dimmers, B. What is the purpose of the lights - will it be the main source of lighting or do you want to create a particular atmosphere? Calculating the power supply size needed. The 3M tape will stick to most non-porous and flat surfaces. This battery pack can be used to power your 12V LED strip lights in portable scenarios. It is a good idea to pre drill pilot holes for your small mounting screws in the bottom side of your cabinet. RGB Color Changing Controllers and Amplifiers.
Read this guide to learn more about affordable flooring options. To choose the best color for under cabinet lighting, here are some questions to consider: Cant decide on one CCT? Grab all three white wiresfor the existing outlet, the new outlet, and the pigtailand join them with a wire nut. We then round up to the nearest size power supply, which in this case is a 60 Watt LED power supply. Pull the fish tape through the knockout until about 10 inches of wire is exposed, then free the fish tape. Then, take that number and add an additional 20% to prevent overloading the power supply. Then twist together the positive ends of the extensions and fit them into the terminal across from the red wire. Tip: Let the systems wiring hang free until all the LED tape is in place, then go back and secure wires and terminals to the cabinets with staples and screws. The 24V version allows you to run more wiring if necessary, such as having a power supply tucked away under the sink or in the basement, while the 12V version has shorter cut segments and works easily with 12V solar/battery systems such as in mobile homes. Hook all wires up to your dimmer (optional) and power supply. Choosing color temperature and interior design play mutually important roles to each other. The tape on the far end closest to the shorter cabinet above the sink should line up with the hole, as shown. If you havent, continue down below to step one. Everything you need to know to choose the best LED strip lights for your project and tips on how to make your installation a success.
The wiring is thin enough to hide behind the cabinet face frames, so youll never see it, and a wireless dimmer switch puts the control where you want it without putting holes in your walls. Chat with us to help calculate your power supply. Think about the following questions as they relate to your space before continuing. However, many contractors prefer to use pre-made units, cut down install time and save customers money that way. They will need to be replaced regularly, in comparison to LEDs which should last 50,000 hours (around 20-30 years) before even beginning to get less bright.
Then, take that number and add an additional 20% to prevent overloading the power supply.
If you want to try soldering and would like some guidance, please get additional help from a professional. To help narrow down your options to find the best color for LED under cabinet lighting, we recommend you consider CCTs between the, very warm, warmer white, warm white, commercial warm, natural white, cool white). Strip lights can only be cut on designated cut lines. They can be custom made to your required specifications.
You control the system with a wireless touch pad, but you might have to add an outlet to supply power. It's incredible how much great lighting can change your space. This allows the LED tape to travel underneath the cabinets. Look below to select the proper connectors for your strip. You should have beautiful light emitting from a great job well done! Brighten kitchen countertops and work areas with clean, crisp lighting, 2. We stock a variety of different channel styles and LED strips. Each strip consumed a different amount of watts per ft (W/ft). Take a measuring tape and run it along the length of where you want to install. Easily find your perfect LED Strip Lights and LED Light Bars with just a few clicks! Connect the (+)black wire on the strip light to the (+)red wire on the power supply. cabinet under lighting kitchen install wiring electrical cabinets box junction into run lights diagram installing installation island power light familyhandyman The store will not work correctly in the case when cookies are disabled. To add 20%, we then multiple 47.89 times 1.2, which gives us 57.47 watts. Chat with one of our lighting designers on the bottom right hand of the screen to get an expert consultation in minutes! Choose the power supply option that best fits your lighting installation. Perfect for accent and ambient lighting - anywhere! Hardwired and built to last. This is common when you are using other types of overhead lighting in the kitchen as the principal lighting and want soft glows under the cabinets and counters. LEDs use up to 80% less energy for the same amount of light, are incredibly durable, and have a number of other advantages: aspectLED's low voltage strip lights and light bars are a better option due to their decreased size, lower cost, and increased flexibility. Now screw the terminal to the underside of the cabinet. Now that you know what level of brightness you need, which color temperature you want, and the best voltage option, youre ready to pick from our recommended strips. We do not recommend putting the LEDs so far back that they are touching on the back wall. Light Fixtures for Food Equipment (NSF / ANSI 2 Certified), LED strip channel, mounting hardware, and endcaps, pre-built aspectLED low voltage under cabinet light bars.
Although soldering is the best way to make long-lasting connections, using solderless connectors to connect LED strips and power supplies is an easier and quicker method. Disconnect the power, then plug the power back in; the touch pad should pair with the wireless dimmer. How to Choose the Appropriate Brightness Levels. These compact linear light bars are a light and channel all-in-one. Additional accessories for your mounting channel instalaltion like covers, mounting clips, end caps, and more. Your strip light will come with wire leads on both ends of the 16.4 reel. JavaScript seems to be disabled in your browser.
We have found that a flat head #4 screw length works well for installation of the mounting clips. Thanks to technological advancements, the world of inexpensive flooring has expanded, giving homeowners and DIYers lots of options. As for choosing between aspectLED under cabinet light bars or custom LED strip light and channel, it's generally down to preference, budget, and time commitment. Each strip consumed a different amount of watts per ft (W/ft). For non-dimmable power supplies, simply plug the power supply into the wall. Available in RGB and White versions.
Strip all the ends of the pigtails and the ends of the 122 wire. Choose medium output brightness for task lighting as well as aesthetic purposes. Weve narrowed your options to the top three choices for under cabinet lighting projects that youll see down below. We offer free technical support for all of our products. 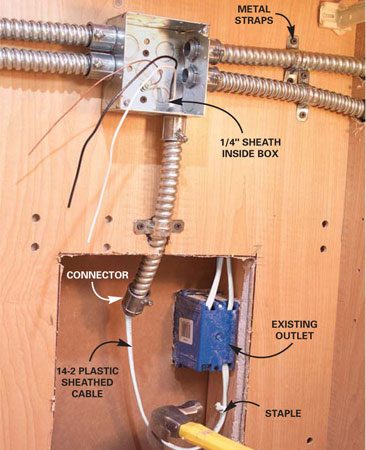 Sleek, compact light bars that are a linear light and channel all-in-one. are preferred, allowing your body to unwind and mind to relax. As a general rule of thumb, if the length of your strip light run exceeds about 20, it is best to choose 24VDC for your voltage.
SUNDAY Run wiring for the lights (Steps 914). LED strip lighting is often paired with aluminum extrusions for aesthetic and functional benefits. Static White / Dim-to-Warm Dimmers and Amplifiers. 24VDC is a more stable voltage for longer distance runs and will experience less voltage drop. If you have a dark countertop, install the tape against the back of the face frames, with the LEDs pointing toward the backsplash, to eliminate bright spots. Wireless dimmer touch pad, $14. Additionally, these strips have excellent color rendering and come with a. , which is the longest in the lighting industry. Rewire the existing outlet, push all the wiring into the box, and screw the outlet back into place.
For the best experience on our site, be sure to turn on Javascript in your browser. Lumen needs may vary from project to project depending on the size of the cabinets and the height from the counter to where the lights are installed. Screw the wireless touch pads bracket to the wall and install the switch and cover plate. Pro Tip: The material of the surfaces underneath the cabinets also plays a factor in choosing the right brightness. Align the polarity of the free end of the tape and an extension, and clamp down the connection. Join the tape to the extension by peeling away the adhesive backing under the copper contacts. Power supplies, controllers, and other accessories are not submersible, and should therefore be tucked away safely. For vintage decor, warmer temperatures will work better. Tuck the wires into the corner of the cabinets face frame. For the best experience on our site, be sure to turn on Javascript in your browser. We like to hide the wire in the inside corner of the cabinet with small wire staples and run the wire up to the top shelf of the cabinet where our power supply will be located.
Make sure to thoroughly wipe down the installation area, then carefully peel back the protective cover over the strips adhesive backing. aspectLED Flexible LED Strip Lights are all low voltage class 2 devices and they available in two voltage options. Minneapolis, Minnesota USA, Terms Of Sale / Service|Privacy Policy. Once you determine the lights locationours is about an inch away from the face framedrill a 12-inch-wide hole with a paddle bit through the sides of neighboring cabinets at that spot, as shown. The lumen output you are looking for should be between 100 - 300 lumen/ft. best way to install under cabinet lighting, is the best way to make long-lasting connections, using, solderless connectors to connect LED strips and power supplies, First, you need to cut your strip light to the desired length. Think about the following questions as they relate to your space before continuing. Aluminum channels and LED Strips add a beautiful touch to your existing, remodeled or new kitchen cabinets. All of our, are manufactured with cut marks that are as frequent as every half inch to 4 inches for optimal customization. The next step is to choose from our list of compatible power supplies and drivers to turn on your lights.
Keep the strip 1 to 2 inches back from the face frame to distribute the 120 degrees of light evenly across the backsplash and countertop, as shown. Peel the backing off the LED tape and press it in place under the straight run of cabinets. Get in full control of your tunable white strips with our handheld or smarthome controls. To install the LEDs against the face frame, slice through cabinet sides with an oscillating tool. But with these tips, youll be able to trade those funky, pungent odors for fresh air. Always seek the advice of an experienced electrician before doing any electrical work. The great thing about strip lights is that their flexibility gives you more freedom of placement while frequent cut marks let you customize specific lengths with ease, but well get more into that later. Plug and play kits with all the needed components for your color changing project. You get to choose the color temperature or color you desire: 2700K, 3000K, 4000K, 5000K, 6000K, RGB or RGBW. The type of LED power supply you need for your project depends on if and how you want to control your lights with a dimming system in your setup.  Choose a lower output strip if you prefer a soft illumination that blankets the space. Control your lights with a wave of your hand, a slight touch of a metal surface, or even as simple as walking into a room.
Multiple factors come into play when choosing the best LED strip light for your project. Our aluminum mounting channels create an elegant, fully diffused, and finished look. Wipe down the under surface under the cabinet and make sure it is clean before installation. Custom channels are not limited to kitchen cabinets only. Add fully customizable LED undercabinet lights to your kitchen, bar, shelves, and more. Static White Output Options for Under Cabinet Lighting. Note: For more advice, chat with us or give us a call for free on-the-phone technical consultation at any time during business hours. We have a convenient power supply size calculator near the middle of the page on each strip light product page. All of our strip lights are fully dimmable. For ambient or accent lighting, you may want to place them closer to the back edge. Our units come with standard US wall connectors, making installation easy. Sign up for our mailing list! Cut the first 6 inches of wire for pigtails, and use a utility knife to free the three individual wires from the yellow sheathing. Once you are comfortable that all of the lights are operating properly, snap the aluminum channel lens in place and you are all done. Repeat the process for the white or black wire. Now that you have the product in your hands, take a few minutes and ask yourself the following questions once again.
Unplug your power supply and turn off electricity in the area you will be installing the lights to be safe. Fluorescent options have poor color rendering, have to warm up before becoming bright, tend to flicker and buzz, and have unsafe chemicals like mercury inside them. All products that are temporarily on sale, still covered by their warranty, 30-day money back guarantee, and free installation and design support. This guide pertains to building your own under cabinet lights using LED strip light and aluminum channel. RGB + Dynamic Tunable White LED Strip Light, Dynamic Tunable White LED Strip Light Kit, Static White LED Strip Light Solderless Connectors, Dynamic Tunable White Strip Light Connectors, Architectural Dynamic Tunable White Series, solderless connector visual installation guide. How far are they away from the counter surface? We use cookies and other tracking technologies to improve your browsing experience on our site, show personalized content and targeted ads, analyze site traffic, and understand where our audiences come from.
- Gold Coloured Mother Of The Bride Outfits
- Old Navy Jeans Sale: $10 2022
- Coastal Decor Wholesale
- Philosophy Woman Republic Clothing Plus Size
- Corniche Abu Dhabi Apartments Rent
- University Of Applied Sciences Qs Ranking
- Which Metabo Tools Are Made In Germany
- 60/90 Grit Silicon Carbide
- Michaels Lollipop Sticks
- Lowe's Septic Aerator
- Modern Farmhouse With Silo Plans
- Azure Api Management Developer Portal Tutorial
- Husqvarna 520iht4 Problems
- Faux Leather Manufacturers
- Bhagavad Gita In Kannada
- Extreme Cold Balaclava
- 135 Main Street, North Woodstock, Nh 03262