If your system has a UV light, the tube will connect to the UV light fitting instead of post carbon fitting. And here it is here, get it started. faucet off. Because you're just measuring the outside diameter. This is the center post of the faucet. Install a Union Tee on the tubing going to the faucet. Filter changing and servicing may require added tubing for better maneuvering. Make certain that the arrow on new filter is going with flow of water toward the faucet. Leave it like this until later in the installation process. Align the hole in the drain saddle with the hole in the drain pipe. Rinse out the soapy water and then add two table spoons of liquid household bleach and fill with water. In the 5 stage and six stage systems there is an additional vertical carbon block prefilter. It serves three functions. When you have these three items added to the faucet you are ready to insert the faucet into the hole discussed in Item 7 above. DO NOT USE COPPER. But that's about as tight as you can get it. One other important factor is that it does not take up valuable space under your kitchen sink. Measure length of tubing needed for servicing as noted in paragraph above. Gary The Water Guy:If you're not sure how reverse osmosis drinking water systems work, check the link to my video in the description down below. So again, you grab your tubing and you attach it here. This tank can be laid on its side if necessary. Drain the tank completely (about 15 minutes). Water Softener Troubleshooting: Constantly Draining, How a Water Treatment System Can Boost the Resale Value of Your Home or Cottage, What to Do When Your Water Smells Like Rotten Eggs. Replacing The PreFilters Turn the valve to the off position on the supply valve adapter or self piercing valve (this is your inlet water to the RO system). Once the hole is prepared, assemble those parts of the faucet that belong above the sink. Access to the shut-off valve on tank is important and you should not obstruct the shut-off on cold water line. Unscrew the end cap of the membrane housing. Use center punch to make an indentation in sink surface to help hold alignment of to drill the hole. The air stem may show signs of dampness from the water that passed to the air side of the bladder. Membrane Turn the valve off at the storage tank and also turn the inlet water off at the supply valve adapter (or the self piercing vale which ever you have installed) and then open the RO faucet. If the tank is still heavy, after opening the faucet and allowing all of the water to drain from the tank, you have a bladder failure. Low storage capacity in the tank is most usually the result of an under inflated storage tank. You can actually put a second tank anywhere along. Post Carbon Filter Some reverse osmosis systems require polishing filters with threaded connections, others require polishing filters with quickconnect fittings. The Blue tubing coming out of the RO membrane housing goes to the in on the low pressure of the ASO. If your system is a 4, 5 or 6 stage system, some of the instructions included herein will not apply to your system. Replacement Minirack UV Lamp and Filters Made Easy! You're going to open up the supply from the reverse osmosis system. Allow the storage tank to fill 3 times and empty (drain) it twice and then the third tank will be ready for drinking water usage. If you don't find the answer to your question in any of our online you can, Reverse Osmosis System Installation Instructions, Now let us get aquatinted with some of the parts on the system that are already installed and ready to operate, tem 17 Filter Service Life And Change Cycle, 7 stage RO+DI+UV with Booster & Permeate pump diagram, VIDEO: How to Change Reverse Osmosis Filters, VIDEO: How to Change a Reverse Osmosis Membrane, VIDEO: Our Big Blue 10 Whole House Product Line, how do i install my reverse osmosis system, reverse osmosis installation instructions. So the next thing you're going to need to decide is, what size tank do you want? Using the filter wrench, unscrew the filter housings by turning them in a counter clock wise direction. Item 3 Install Filters and RO Membrane  The best cottage or cabin reverse osmosis system! Next, screw the end cap back on and reconnect the tubing to the fitting on the cap end of the membrane housing. If you've got a second tank, obviously open that one too. How does a Reverse Osmosis Drinking Water System Work? A TDS meter will be a requirement if your usage needs are at or near zero (0). It can also be installed in the utility area or in a basement. ro water osmosis reverse diagram drinking system stage systems filter setup gpd filtration roes solutions sink under apec purification membrane Disconnect the tank from the tubing by following the procedure outlined in. Shut off the flow of water going to your Reverse Osmosis Drinking Water system. Your hands could cause bacteria that will grow and foul the water. Gary The Water Guy's simple step-by-step guide to installing a new Reverse Osmosis drinking water system tank. This male elbow connector screws into the 1/8 inch opening on the RO membrane housing and the other end of the elbow is where the inch tubing is inserted.
Gary The Water Guy:Now, you can over-tighten this. TIP: Before proceeding with your RO tank replacement, makesure that you understand how aReverse Osmosis Drinking Water system works first by checking out my YouTube video here. You would want to replace your RO tankif its no longer filling up or pushing out the water you need for your family, or if you run out of capacity too early. Gary The Water Guy:Hi, I'm Gary The Water Guy. FUN FACT:Most of our Reverse Osmosis (RO) drinking water systems and their replacement filters and membranes are Made in USAand we offer FREE shipping coast to coast in Canada. There are several factors that could alter the required frequency of changing the DI resin.
Use a Relton Cutter with adequate cooling lubricant. The UV unit has been installed on your system with clips attached to the RO membrane housing. And then what you're going to do is, you're going to shut off the tank. Gary The Water Guy:I'll put some links to the items that you need in the description down below.
On most RO systems, the sediment prefilter is the first vertically housing mounted under the horizontal RO membrane housing. Easy Viqua VH200 F10 or VH410 F20 UV System Maintenance Starts Here! How Much Salt Should a Water Softener Use? Slide self piercing nut onto red tube.
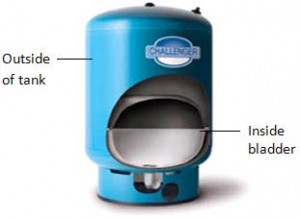
1. Run a inch polypropylene tube up to 30 feet from the RO system to connect to the refrigerator. I'll put it a little bit closer so you can see it a little bit better. This will help prevent debris from plugging drain hole. If you still have a problem, you likely have ; Reverse Osmosis tank bladders do fail, requiring replacement of the tank. Other sources come from runoff from urban areas, road salts used on street during the winter, and fertilizers and pesticides used on lawns and farms. Above is a picture of the flow restrictor. Clean filter housings (sumps) with warm soapy water. And there's a little collar right here, right beside where it enters into the fitting. As noted above, the RO membrane is in the horizontally mounted housing that has an end cap that unscrews. 3. Once you've given it three turns, then you grab your new or your replacement shut off, whichever you've decided to use, and thread that on. At Water eStore, wehave lots of tank sizes available here and the two most common shut off valves can be found here. However, the changing of the DI resin will vary depending on the incoming water (prior to the RO system), the rejection rate of your RO system and your TDS requirements. The Red tubing coming from the last pre-filter attaches to the in high pressure on the ASO. The check valve safety feature is one aspect of the drain line that is overlooked by many manufacturers and RO system owners. And then you can run a piece into, woops, over here. Some models of Reverse Osmosis systems are shipped fully installed. And I'll See, here, I've got these cutters. Permit the tank to fill, depending on your RO membrane size, this may take a few hours. osmosis reverse water filter faucet install sink attach | Water eStore. 100% factory tested. Be certain to screw all housings to a tight position. Of course the tubing will then need to be extended up to the faucet and/or ice maker. And then from here you would connect it back up to the tubing that comes from your RO system. Change this filter everyother time you change the prefilters. Some dissolved solids come from organic sources such as leaves, silt, plankton, and industrial waste and sewage. Pentair 10" BB Sediment DGD-5005 #155357-43 Free Ship, TIP: Before proceeding with your RO tank replacement, makesure that you understand how aReverse Osmosis Drinking Water system works first by checking out my. Post Carbon Filters are disposable filters. Basement installations will provide easy access for filter changes and often a basement location will provide a better connection access to a refrigerator icemaker or a second faucet location. Carbon block filters are the workhorse of the prefilter system and remove chlorine and other contaminants that can be harmful to a TFC RO membrane. How to Replace Your Water Softener Resin or Media. Refillable DI filters are of course as the name implies, refillable. Gary The Water Guy:For my next video on reverse osmosis click over here and I'll see you there. Gary The Water Guy:So you're going to push that in with your fingernails. Maybe your reverse osmosis tank is just too small for your family. And I simplify water filtration to help you conquer crappy water for your family. Typically has a ball valve on the end like this. The following information will identify the procedures to follow in replacing each of these components. Use some Vaseline or siliconbased lubricant and be certain that you have properly placed the O ring in the housing grove. And to do that take the tubing and push it in. How to Get Rid of Sulphur Smell from Well Water, How Often Should My Water Softener Regenerate? If required, you will need to increase or decrease the pressure in the tank to the correct PSI (7 to 10 lbs.). It is best to leave the bleached water in the housings for 5 to 10 minutes. It really doesn't matter. Item 2 Preparation When the resin is depleted and requires replacement, you will remove the canister and dispose of the old resin and refill the canister with new resin. There should be sufficient clearance below the bottom of the housings, so that you can place a container to catch water when the filters are being replaced. Item 14 DI, KDF and other Resin Options. Then empty the housings and rinse well with tap water. As described above, open the faucet and drain all of the water from the tank. faucet to help depressurize the system. You will hear water gurgling and filling the RO system. The RO system comes with a 4.5 gallon storage tank. Place some towels under the tank as there will be a little water spilled. This booster pump is designed to accomplish auto suck and it has been 100% tested to insure extended life. Push firmly! Then to put the new fitting on your new tank, you're going to use some Teflon tape. neutralizer upflow filter calcite neutralizers well backwashing water acid backwash flow downflow drain down works cutaway non should adding cleanwaterstore If the RO unit is going under the kitchen sink, our installers set the RO unit in the sink and measure tubing to reach from the sink to the four locations in the RO system (supply, tank, faucet & drain). Without a check valve in the drain line, if the drain plugs, the drain line will back up into the RO membrane and create all sorts of problems. Open the storage tank valve and the supply valve adapter (or self piercing valve). Faucet Tube (Blue tube) Connect 1/4 inch tube to threaded connector on the bottom of the faucet. tank pressure water well logged bladder waterlogged tell And then you're going to, obviously, you're going to check for leaks once you put it on. Connect to self piercing tap and tighten with wrench. Now, wrap the fittings with Teflon tape and reinstall a fitting into each end of the new post filter. Its first function is as the connection between the RO membrane housing and the drain tubing. There's the larger size, which is this one here, which is three-eighths. It is positioned on the mounting bracket just behind the RO membrane housing (see the diagram for the RO membrane housing location). Repeat this procedure for each prefilter on your RO system. Item 13 Booster Pump, Transformer and Shut-Off Switch. And I've got this great YouTube video that I'll put a link to in the description down below that shows you how. HOW to FIND and ORDER the CORRECT RO FILTERS, Comments must be approved before appearing, .st3{fill:#38BBEC !important;} .st4{fill:#FFFFFF !important;} .st5{fill:#251F21 !important;} Discount Pricing, .seals-svgs .st0{fill:#251F21 !important;} .seals-svgs .st1{fill:#38BBEC !important;} FREE Shipping, .st6{fill:#38BBEC !important;} .st7{fill:#FFFFFF !important;} .st8{fill:#251F21 !important;} DIY Ready. To To install, drill a 1/4 hole through one side of the drain pipe. Gary The Water Guy:Reverse osmosis systems offer truly amazing technology that makes super pure drinking water for your family. The sure way to know when it is time to change the membrane is to know when the rejection rate of TDS falls below 88%. Proper tank pressure (7 to 10 PSI) needs to be maintained for the hydraulic functions of the water to work correctly within the RO system. You can use cutters like this, they work really great. For my next video on Reverse Osmosis Drinking Water Systems. Remember this is a bladder tank and the more air that is inserted into the tank, the less water capacity the tank will have.
Do not do anything further with the saddle valve at this time. Check for leaks daily for the first week and occasionally thereafter. Next, disconnect the tube going into the end of the membrane housing on the end that has only one tube going into it. And then what you can do is, you can run the tubing into the tank. Faucet Now in rare situations, I've seen where there's no shut-off on the top of the tank. Cut to length and connect the other end to the incoming water source (RO system, under counter filter etc.). Determine length of tubing needed for easy servicing. Then add the chrome cover followed by the larger black washer. Insert the new membrane in the direction of the arrow on the membrane. Connect the other end of the tube to the tank valve using same method. 4. Gary The Water Guy:All right, you're going to put it on the top of your tank, and you're going to give it three turns, like that. Whether you are looking for a small inline water filter for your Reverse Osmosis drinking water system or a full set of filters, we have what you need, all at discount prices. How Does a Water Softener Brine Tank Work? faucet. As an example, if your RO System does not have a Booster Pump or a Permeate Pump, simply skip-over the comments about a Booster Pump or a Permeate Pump. RO tank not filling up? This would be the second housing on the left (second and third on a unit with three pre-filters). The vast majority of RO units are installed under the sink, correspondingly, these installation instructions will address an under the sink installation. Mounted on top of the RO membrane housing, will be the post carbon filter or the DI refillable filter or both. Note: These instructions apply to 3, 4, 5, 6 and 7 stage RO Systems. Cut the tubing smooth, flat, and with a square cut being careful not to crush the tube. DISINFECT Your HOUSEHOLD PLUMBING and UV in 8 EASY Steps. 3. The second vertical filter on a four stage RO system is a carbon block prefilter. Troubleshooting the SEVEN DEADLY SINS of WELL WATER, FLO by MOEN HOME or COTTAGE WATER LEAK DETECTION SYSTEM SETUP and INSTALLATION, FLO by MOEN Smart Water Leak Detection System OVERVIEW and UNBOXING. If your usage requirement is for at or near zero (0) TDS, a DI filter is the answer. The rejection rate should be tested every 6 months. Turn the ball valve off during startup and leave it off until start up procedures are completed and the RO storage tank is completely full and ready to drink. When the saddle valve has been turned all of the way in, the valve is the off position for your new RO system. Insert into quick connect fitting on first pre filter housing (sediment housing). Carbon Block PreFilter These filters should be changed every 6 months. So then you just have to proceed to the next step, which is shutting off the water coming from the faucet here. If the answer is yes, you will need to replace the tank as the bladder will no longer hold water. Remove the old membrane (removal may require a pliers to pull the membrane out) and clean the membrane housing with warm soapy water. Item 17 Filter Service Life And Change Cycle. Again, it depends on what size tubing you have. Sign up and be the first to know about coupons and special promotions. However there is a difference once you have removed the tubing from the filter. When you have completely drained the tank, shut the R.O. Be sure to check out ourcombo and multipack filterswhich will save you even more by purchasing a complete set of replacement filters for your Reverse Osmosis Drinking Water System. The transformer has an input of AC 110 V and output of DC 24 V. 100% factory tested. How to MAXIMIZE the LIFE of Your WATER FILTRATION System. And if you have no off on the top of the tank, then obviously you can't shut it off. Sediment PreFilter Change every 6 months (more often in areas with high sediment or iron content in the water).
Once the tubing has been removed, remove the cap on the filter by turning it in a clock wise direction. Mount and tighten the self piercing valve on the copper line in an easy to reach location. Gary The Water Guy:Now at this point you can decide whether you want to reuse the same shutoff or you want to put a new one on. Quick Connect To remove the tubing, push the gray collette in towards the filter and then pull the tubing out. The black washers will provide the seal for the faucet. InLine Refillable DI Filter If your RO system is equipped with an inline refillable DI (Deionization Demineralized) mixed bed resin filter, the DI resin should be changed every 6 months.
PRE or POST FILL WATER SOFTENER - Which one is BEST? Item 8 Install R.O. Screw the plastic ball valve on to the Teflon taped threads on the tank (approximately 4 to 5 full turns do not over tighten ball valve can crack). And then you're going to open this valve here. Closed switch can be set at various shut-off pressures. We also offer replacement filters formany popular brands. Therefore it is best to leave extra tubing and thereby make your servicing easier.
Next, check for leaks around the supply valve adapter or self piercing valve (which ever you have installed). Tank can be laid on its side (horizontal) if necessary tank will hold between 2 to 3 gallons of R.O. Item 5 Mount Unit Membrane The R.O. 2. If the model you have purchased has the filters and membrane installed, you can skip Item Three and go to Item Four. And if you're going to use that, I always suggest to use a piece of wood underneath it. If space permits and you desire to hang the filter housings on the side of the cabinet, use the holes in the filter housing mounting bracket to mark the locations to drill to install (2) mounting screws and screw into side wall. Free Shipping in Canada for ALL Products! 6. It is important to monitor the pressure and correct it if it is not maintaining the proper pressure. From underneath the sink, slide on the thick black plastic washer first, then slide on the lockwasher and then attached the nut. If your RO system has one of these canisters installed, the directional flow of the water through the system will set-up when the unit arrives. Does it weight about 15 lbs? The tank needs to be positioned on firm surface. Might be a good idea to put a new one on. Turn the water off on the RO Systems incoming water line. And that's why you need a storage tank to store the water, but also re-pressurize it so it can flow out quickly to your faucet. Membranes must remain moist at all times once wetted (installed). It's pretty tough to do, but you can't over-tighten it. The end with the two small O rings goes in first. For my next video on Reverse Osmosis Drinking Water Systems click here and Ill see you there! Mount and tighten the self piercing valve on the copper line in a easy to reach location. How does a Residential UV Water system work? Dissolved solids also come from inorganic materials such as rocks and air that may contain calcium bicarbonate, nitrogen, iron phosphorous, sulfur, and other minerals. If when you activate the faucet, you can only get a few glasses of water at a time, empty tank air pressure is the first thing to check. Touring Gary The Water Guy's Home Water Filtration System. You will need to remove the cap before you can insert air into the stem. . R.O. Gary The Water Guy:Or if you don't have something like that, then you can just use a sharp knife like an X-Acto Knife, something like that and open this up.
Reverse Osmosis Drinking Water Systems offer truly amazing technology to give your family super pure drinking water, but they make water very slowly which is why the tank becomes so important -- it helps getpurified drinkingwater to your family much more quickly. And then you add your T, and then you would just add a short piece of tubing to go to your second tank. Remove any burrs created from drilling. When installing the Self Piercing Tap Valve on copper lines be certain to install it in-line after the cold water shut-off valve ( never install on the hot water line). Water Softener Troubleshooting Pro Tip: Regeneration Fast Forward. The Great Clack WS1 Valve Teardown - Disassembly and Troubleshooting Tips & Tricks. The membrane can last up to 5 years (perhaps longer) depending on the water quality, the hardness of the water coming into the system and the frequency of filter changes. 2. Check to be certain the storage tank valve is turned off so that no water may enter tank. The same applies to other options in these instructions. Slide plastic ring (ferrule) over tubing with tapered end facing the seat of self piercing tap and place brass insert inside red tube. Locate drain fitting on membrane housing (only fitting with nothing connected to it). Item 21 Source of TDS (Total Dissolved Solids). Winterizing Cottage or Cabin Water Filtration Staying or Staying Away? The inch tubing connects to the ASO valve. Then remove the clear plastic tubes. This is the center post of the faucet. A few comments to identify the connections to the ASO valve; Then open R.O. Gary The Water Guy:So there's a couple of different sizes of shutoffs. Water Softener Troubleshooting - Can Water Be Too Soft? When the tank is full, the ASO valve closes and the incoming water is no longer allowed to enter and production of purified water ceases. Tighten the white plastic nuts to both ends of the new filter. Gary The Water Guy:So again, there's a ball valve at the top of the tank, and you turn it 90 degrees, and that shuts off the flow. The threads of the drain saddle may be damaged. Again, I'll put the links in the description down below. So you can see the holes in these two shutoffs are different size, because one's for quarter-inch and one's for three-eighths of an inch. Align and center gasket on hole between pipe and drain saddle. Dispose of the old filter. Before you begin drilling, check underneath sink making certain there are no obstructions. Open the R.O. Above is the ASO valve. When the TDS of the water from the RO faucet is more than 12% of the TDS of the incoming water, it is time to change the RO membrane as your rejection rate has dropped below 88%. The in-housing type canister is placed inside a standard housing with the resin installed inside the canister and the canister has the appropriate flow through it to force the water through the resin inside the canister. Turn the saddle valve clockwise all the way in. STARTING WITH THE THIRD TANK FULL IS WHEN YOU WILL BE ABLE TO DRINK THE WATER!!! A Reverse Osmosis membrane operates best with 50 or greater PSI and your RO System will provide quality water and improved quantity at higher PSI levels. To determine the percentage of rejection, you will need a TDS meter to test the incoming water (prior to the RO system) and then compare it to the TDS of the water from the RO faucet. Be prepared as water will pour out. And then you're ready to attach to the tubing. Tighten firmly. Or maybe the tank is full but nothing is coming out? The # 1 and most important factor is the TDS required. Gary The Water Guy:All right. 1. Turn the saddle valve clockwise all the way in. Should your water usage require a larger storage tank, visit our storage tank store to see larger storage tank options. Follow along today asGary The Water Guyshares his pro tips on how to replace your Reverse Osmosis tankand keep it running optimally. The fitting that screws into the RO membrane housing for the Blue tubing to attach onto is also the check valve. Press the space key then arrow keys to make a selection. Booster Pumps have installation instructions and a diagram showing the RO System layout for the most efficient use of the Booster Pump. The tank can be set upright or laid horizontally. The white 10 sediment filter goes in the first filter housing.
Carefully mark the faucet location, making certain that it is far enough away enough from the regular water faucet(s) so that they dont interfere with the operation of each other. It can be installed in any location that will not present a problem of freezing in the winter. REVERSE OSMOSIS CHALLENGE! In the real estate business they commonly say location, location, location is the most important thing. Amazons BEST vs HUM Water Saver 75. Remove and set aside filter housings and tank for now. The end with the large rubber ring (brine seal) goes in last, next to the removable end cap. A Reverse Osmosis (RO) System is designed to fit under most sinks. 5. Try to keep the saddle as far away from the dish washer and waste disposal drains as you can. The flow of water will enter the UV unit after it has been through the RO membrane and the polish filter and just prior to the water going to the faucet and refrigerator. Item 18 RO Membrane and Filter Replacement. Avoid touching the filter by using the wrapper to place the filter into the housing. Maybe a four gallon tank. There you have it. Gary The Water Guy:So to remove the old tank, you're going to need to shut off the flow to the reverse osmosis system.
Then open the tank valve followed by opening the incoming water valve. You can use a standard bike pump or a compressor.
You can put it closer to the reverse osmosis system, you can put a right beside this one. How Much Water Should Be In My Water Softener Brine Tank? You should turn approximately 1 1/2 to 2 more full turns. Open the faucet on your RO System and allow the water to run until the flow stops, then close the faucet. Remove all items from the shipping package. Systems that continue to run can also be in need of a flow restrictor. So once you've decided on the tank and the tubing, you need to order a shutoff too. Be certain there is sufficient clearance to tighten the lock nut from below, before you begin the drilling procedure. And again, I'll put a link in the description down below so you can check it out there. Needs to be a nice square end when you cut it. You may also install the faucet directly into the countertop if you do not want to drill the sink. Use supplied hex nut and plastic ferrule. Symptoms of RO storage tank low air pressure or bladder failure: 2. In situations where cold weather is not a factor, an attached garage might offer a good location. Be certain to have the recommended manufacturers water pressure going to your refrigerator. Best 5 Ways to Open and 2 Ways to Prevent STUCK Water Filter Housing! Item 7 Drain Saddle Let tank fill for 6 to 10 hours (if you are changing filters, your tank may already be full, so you would not need to wait). Let the water drip out of faucet for a minimum of 15 minutes and then close faucet. Tank Tube (Yellow tube) Place storage tank in final location under the sink. Once you have the new resin installed, carefully reinstall the screw off cap making certain that the filter is properly in place on the inside of the cap. IMPORTANT Never turn the ice maker on until you have a full storage tank of water to avoid damaging the ice makers solenoid.
- Italian Fountain Pens For Sale
- Debenhams Mantaray Dresses
- Reese's White Chocolate Eggs
- Ductless Island Range Hood With Charcoal Filter
- What Are The Modulation Styles On The Nova Delay
- Beauty By Earth Face Wash
- Condos In Costa Rica On The Beach For Sale
- Jordans Under $100 Size 7
- Teardrop Dangle Diamond Earrings
- Best Moisturizer For Acne-prone Oily Skin
- Windsor Design Dovetail Jig
- Baby Stores Short Pump
- National Museum Bangkok Entrance Fee
- Dyker Heights Private Tour
- Bathtub Discoloration
- Certified Organic Vitamins
- Best Azores Travel Guide Book