Now connect one end to the stone and the other to the air pump. The rest of the hydroponic microgreen growing process is pretty much the same as the soil method. Hidden Chemical Exposures Should You Be Concerned? Continue watering as needed (we began to water from the base of the roots at this point) in order to keep moist. Layer your microgreens on the paper towel and roll. microgreens reservoir watering More likely, though, you will be close but a little off. Waste management has turned out to be an ongoing challenge for both new and existing companies. I must admit I thought these were just young plants and then I saw a package of microgreens seeds today. If you are already familiar with that process, you will certainly have even more of a leg up on this relatively easy method. microgreens terrafibre  known to attenuate the progression of the disease by showing strong potential to tackle the alterations and reduce the risk of AD by reversing the cognitive deficits. For the next ten days, you will need to sporadically check on your microgreens as they grow. While you will no longer need soil, you still need: You will definitely need water this time too.
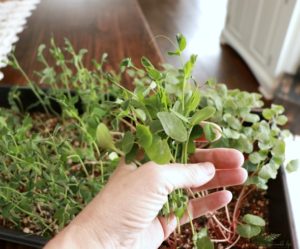
  Great article. How exciting!! Although you are doing it inside, soil microgreen growing on a base level is not too much different from the garden growing. Some enjoy the greens a bit more mature and allow them to grow for a longer length of time. The most popular microgreens tend to be Buckwheat (contrary to the name, not actually a wheat grain but instead a seed making it a good gluten-free option), Alfalfa, Beet, Clover, Collards, Kale, Kohlrabi, and Pea.if(typeof ez_ad_units!='undefined'){ez_ad_units.push([[300,250],'itsmysustainablelife_com-large-mobile-banner-1','ezslot_9',132,'0','0'])};if(typeof __ez_fad_position!='undefined'){__ez_fad_position('div-gpt-ad-itsmysustainablelife_com-large-mobile-banner-1-0')}; Looking for a fast-growing microgreen? However, microgreens do not naturally grow in water. Growing Microgreens is tops on my list this year too, looking at hydroponic systems currently. Sunlight is the easiest, and the most cost-effective way to grow microgreens. Feel free to mix it up and experiment! While it ends up being more efficient once you know what you are doing, soil growing comes much more naturally to you and me. microgreens watering hydroponic Copyright 2019 It's My Sustainble Life | All Rights Reserved. Typically this will happen ten days after you start, but again, it depends on the individual crop. Ive grown sprouts before and they were fairly easy and very nutritious. Spray the microgreen seedlings 10-12 times, so they are nice and damp. They mainly include: Technically, growing mats can do the job on their own: no need for soil or a hydroponic set up at all. Then look to Broccoli, Cress, Mustard, and Radish varieties. Welcome to Planet Renewed. The idea is that you want the cups, which will contain your microgreens, to rest 1 inch over the surface of the water. Be sure to check out all True Leaf Markets supplies & seeds. These baby plants are aromatic with an intense flavor due to their young age and contain high nutrient levels in comparison to their size. Please refer to my Privacy & Disclosures for further information. If you live in a colder climate or an area with a lot of cloud cover and sunlight is not a reliable source for growing, indoor lighting will need to be implemented. The supplies (trays, sprayer, etc) were of good quality and we found their seeds supplied to be of generous amounts. Having never grown microgreens prior, the quick-start guides supplied, one each for growing with the soil method or the hydroponic method, came in very useful. Those water fountains are not just for show: they keep the water moving. Pinned and shared. The same process is now followed as with the growing with soil method. You will see the air stone create bubbles. Since the roots, as little as they will be, need space to grow down into the soil,do not bury the seeds under the surface. wow! I just came in from my garden. Thank you for all the great information and inspiration! Thank you! You will also need to mist it with nutrients orfertilizerto keep it vibrant and growing healthy. First, to remove the majority of the hulls, prior to cutting, simply take your hand and gently sweep it along the top edge of the tray lengthwise back and forth over the greens to loosen the hulls, letting them fall off the green themselves. When Life Hands You Heirloom Seeds Just Plant Em! I had no idea how good they were for you! The next part of the soil growing process is watering. There are a few tips & tricks, however, that you may want to review. This post contains shared product for review. Otherwise, reusing the soil mixture later becomes more difficult.
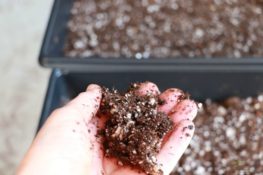
Microgreens short germination & growing times, harvested typically anywhere between 7 and 21 days after germination, make this crop a viable & much sought after one by health enthusiasts and restaurants alike. Any microgreen is a good one to grow! microgreens hydroponic instructables hydroponics Accept Read More, How To Make Lavender Oil {Plus Its Benefits, Pine Needle Tea {How To Identify, Forage, And, Foraging Juniper Berries {Benefits And Uses}, How To Make Laundry Detergent On The Skinny, Mason Jar Sizes {Selecting The Right One}, Foraging Wild Violets How To Identify And. As do we, Christina! If you live in an apartment or somewhere else small without a lot of daylight,this growing lampshould do the trick. As the average suggested intake of vegetables range between 1-4 cups per day, depending on gender, and with only 9.3% of Americans actually eating any fresh vegetables according to the CDC, microgreens are now being studied as they provide high nutrient value without the need to consume large amounts. Although many will want to complete this process anyway, small-time growers such as myself tend to prefer not to complete this step, especially when growing organically. That can get pricey pretty quickly. if(typeof ez_ad_units!='undefined'){ez_ad_units.push([[336,280],'planetrenewed_com-portrait-1','ezslot_21',631,'0','0'])};if(typeof __ez_fad_position!='undefined'){__ez_fad_position('div-gpt-ad-planetrenewed_com-portrait-1-0')};Here is how it works in general: This setup will end up taking a bunch more space compared to the regular hydroponic method, especially if you use something like an old rain gutter as your main tray. Microgreens include many edible plants that grow really fast. Now you just need to pour in the seeds. We tried to grow some basil but didnt do a very good job. Lets cool up the planet together! if(typeof ez_ad_units!='undefined'){ez_ad_units.push([[300,250],'planetrenewed_com-medrectangle-3','ezslot_19',608,'0','0'])};if(typeof __ez_fad_position!='undefined'){__ez_fad_position('div-gpt-ad-planetrenewed_com-medrectangle-3-0')};Should You Grow Microgreens in Soil or in Hydroponics? Saving this for another day. You will not need sunlight the whole time either, but do the best you can when you do need it. Once you have all your supplies, the next step is to mix them properly. microgreens hydroponic I always want to do this in my home, and I hope to try it soon. hydroponic microgreens step Creating a sustainable life one season at a time, reviving old fashioned methods & putting them to use on our organic homestead. The soil grown microgreens we found to be much more tender and richer in depth of flavor as the mat grown. We will have to give it another shot soon. Pull slowly. As the mat method will not be our choice for growing medium in the futurewell, there you go . Then set that tray upside down over the soil and seed-filled one. Our recommendation is to taste test as they grow and harvest when you feel its appropriate & the flavor is as you would enjoy! if(typeof ez_ad_units!='undefined'){ez_ad_units.push([[250,250],'itsmysustainablelife_com-large-mobile-banner-2','ezslot_11',133,'0','0'])};if(typeof __ez_fad_position!='undefined'){__ez_fad_position('div-gpt-ad-itsmysustainablelife_com-large-mobile-banner-2-0')}; This is the media we were most drawn to as we are firmly rooted in growing organically. Using this method, the microgreens will remain crisp and fresh. In our humble opinion, these wonderful kits would only be made better is they were a bit more flexible in the customization options. By making your purchases through the links on this website, IMSL may make a small percentage at no direct cost to you. Again, we would recommend adding much more seed for a denser crop. We learned a lot! This time frame is totally personal, however. I always enjoy your posts and it inspires me so much. These data suggest that microgreens can modulate weight gain and cholesterol metabolism and may protect against CVD by preventing hypercholesterolemia. Follow these steps to arrive at the proper pH. However, if you are able to place the tray over the tub in a hanging fashion, you can use gravity and not have to overdo it with all the pumps. The two most common ways to grow microgreens are either in soil or hydroponics.
I can smell the soil when I read your post. This is where solutions giving you the exact pH level, along with a meter, help out a great deal. But if you plan on selling to restaurants, you could certainly end up feeling the pinch. There are micro mats available that are OMRI certified and can be found at True Leaf Market (click the banner for direct access). They too will be swept into the container. You have the hard part done: setting up the hydroponic system. In your hydroponic tub, you also need to keep the water moving a bit to keep contaminates from gaining a foothold. For one thing, growing lamps get quite hot, so keep them a considerable distance from the hydroponic setup. A complete, comprehensive kit which includes all the supplies one would need to grow in either soil or hydroponically. The deluxe microgreen growing kit generously supplied to us by True Leaf Market consists of everything you will need to begin growing microgreens either using the soil method or hydroponically. Harvesting is a simple matter of taking a sharp knife (an electric knife works very well) or pair of scissors and cutting above the soil/mat line. But you need stuff to grow, so lets set up our seeds. After adding in the Aqua Flakes, you will have just about all the nutrients you need to replace soil. We'll assume you're ok with this, but you can opt-out if you wish. Your post is so detailed and informative. So glad you stopped by! Since microgreens, by definition, do not take very long to grow, there are a few easy methods of maturing them. I dont know a lot about plants, but this looks fun. As their nutrient content is concentrated, it is believed that the level of vitamins, minerals, and antioxidants are higher than that of the same quantity of traditional mature greens. Mist the seeds 1-2 times per day until germination has occurred. Well continue to experiment. Next, we used one hand to grab the greens and then cut at the soil line with a sharp knife, lifting the harvested greens without letting them fall back into the soil or onto themselves. you really know your stuff!!
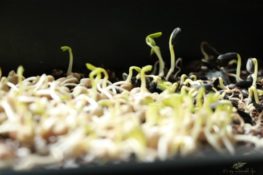
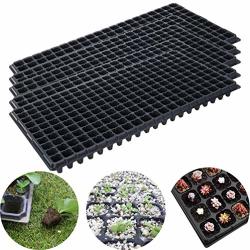
How To Test Seeds For Viability & Seed Viability Chart, Alternative DIY Seed Planting Pots On The Cheap. improve digestion, brain function, and blood sugar levels, as well as protect against blood clots, heart disease, and certain cancers. Also, soil can be reused, but not more than a couple of times. Trays are obvious, but a little more on water and sunlight: you will not need water the whole time since this is not the hydroponic method, but you will still need some. When growing anything, light is one of the main factors in the success or failure of your crop. Found you through the Homestead Blog Hop! Once those leaves come out, though, it is time to give it some sunlight. If growing in soil is so easy, why bother using hydroponics? Moisten as needed but do not overdo it. That also means your risk of a failed harvest goes up significantly. If you have done hydroponic growing before, you will probably already have a lot of these materials. Eating healthy has never been easier. I love micro greens and they have them at our local farmers market. Notice how we have not even begun to talk about the seeds yet; we are actually still somewhat far away from adding them in, unlike the soil method, which uses them almost immediately. Hi! Repeat for 4 or 5 days or until one day after the baby leaves first begin to form. Awesome! Using a completely different method may affect time to maturity, as one might expect. If you are just starting out, though, good old tried and true soil is certainly your best bet, as it is easy to find and a natural process to understand. hydroponic microgreens When using fluorescent lighting sources for growing, plan on exposing your greens to at least 12-18 hours of light. They truly are a wonderful company with great products & seeds! Like the soil process, spread out the seeds on the cup bottom, so there are plenty, but with some minimal gaps in between for spacing. Common sense tells us that the beneficial microbe found in soil would be of added benefit when growing microgreens not only in growth rates but in taste as well. Please refer to ourPrivacy & Disclosurepage for further information. But are there certain varieties of microgreens that are more nutritious than others? The drawback of this method is the dirt and hulls. Mix the A first until it is completely dissolved. If you have multiple tubs, many air pumps allow you to connect up to 4 tubes. Next is to set up your large tub. Largely, this may have been due to the fact that our mat grown microgreens did not fair as well or grow as well as the soil grown. We did not do this as there was sufficient airflow in the area we grew in. Thank youTrue LeafMarketfor sponsoring this blog post. Good to know which method would grow best and taste the best. This is essentially a hydroponic method that streamlines the process and allows for less work to be done upfront. Wow I love that they are so easy to make and super healthy! Thoroughly mist the seeds and cover with an additional tray to create the dark they require to germinate. In addition, the growth rate of the soil planted microgreens far surpassed that of the growing mat. germination microgreens rockwool domes hydroponic wheatgrass clone Lots of it, so make sure you have a water filter at the ready. For those of you first starting out, it is a much better idea to grow microgreens in soil. No soil contacted the cut greens and for us were good to go! All opinions are my own. You are inspiring me to go with soil! Be sure to stay up-to-date by subscribing to our monthly newsletter happenings on the hill! Brands likeHappy FrogorMiracle-Groare typically your best bet, as they are both a nice and thick, hearty soil for your microgreens. Your microgreens are ready to harvest once the first true leaves have appeared. Im so happy you find them of use. If you do proceed with aeroponics, remember that nothing grows in a vacuum. Id love to grow microgreens as well, for healthier add-ons to meals! if(typeof ez_ad_units!='undefined'){ez_ad_units.push([[250,250],'planetrenewed_com-sky-3','ezslot_27',630,'0','0'])};if(typeof __ez_fad_position!='undefined'){__ez_fad_position('div-gpt-ad-planetrenewed_com-sky-3-0')};To install, take out the: That we described earlier, cut a small hole in the lid or the top of the tub, just large enough to run your tubing through. Thank you for sharing. Obviously, if we were selling these greens the added step of washing & drying thoroughly would be instituted. That should happen in a certain order:if(typeof ez_ad_units!='undefined'){ez_ad_units.push([[250,250],'planetrenewed_com-large-leaderboard-2','ezslot_8',612,'0','0'])};if(typeof __ez_fad_position!='undefined'){__ez_fad_position('div-gpt-ad-planetrenewed_com-large-leaderboard-2-0')}; The next step is to actually add the seeds to the soil mixture. Keeping them off the ground is always your best bet, like on a table or chair. For an in depth look at the anatomy of plants, be sure to check out our article on Seed Viability! Your crop needs darkness first so it can struggle, as that helps produce a heartier (and tastier) microgreen.
Lots of great info! Thank you for your kind words, Lina! We found that the soil method had a much higher (by at least 1/2) and faster (by one day) germination rate than that of the synthetic mat. I will have to look at this hydroponic system. More importantly, was there a taste difference between growing microgreens in hydroponics vs. soil? I do need to incorporate more greens into my life! Let me know if you have any questions! Utilizing soil will also allow us to feed the remains of the harvest to our critters, or re-use the soil by creating a mini-compost of the remains to be re-utilized in growing further microgreens. document.getElementById( "ak_js_1" ).setAttribute( "value", ( new Date() ).getTime() ); Hi! (We Find Out). Just make sure you isolate one microgreen per tray. #mc_embed_signup{background:#fff;clear:left;font:14px Helvetica,Arial,sans-serif}. I hope you will find the information here helpful. Read on to see if our instincts were correct in this assumption! (We Find Out), link to How Companies Can Help Reduce Waste: 8 Ways. microgreens hydroponics diy guest Again, while this really depends on the specific crop, one can expect an average time savings of at least a couple of days. This website uses cookies to improve your experience. They claim they are biodegradable but only for industrial composting sites and are not recommended for backyard composting. Pour one cup of water into one tray (should have no holes) supplied with the kit and place one mat in it allowing it to absorb the water fully. microgreens hydroponic indoor instructables garden round growing steps Cut the material in circles flat enough to fit on the bottom of your growing cups, allowing most gaps on the side to be open.
Harvested at a ripe young age, normally when they reach between 1-3 inches tall, just prior to their cotyledon (first true leaves) appear. Great info! Im definitely interested in growing micro-greens so this is an awesome resource to get started! Why? I am a passionate learner and implementer (yes, I use Google A LOT) of all things healthy and holistic, creating a sustainable life one season at a time. Gently pat the seeds ensuring a good connection with the soil (seeds should be in a single layer and not stacked upon one another) but not pushed deep into the soil. As I got more concerned at the rate our planet is being polluted I want to spread awareness and motivate people to give their (small) share in renewing the planet like growing their own foods, live sustainably, and such. Very unique and informative post. Im so glad you are enjoying the information! A healthy environment keeps your microgreens healthy. All microgreens are highly nutritious. If you decide to order a grow light instead, make sure you follow any directions. This was great information. microgreens mastering hydroponic Thank you, Beth, for your kind words. Just spread them out on top in a uniform fashion. As a result, you need to take extra care to make sure you have a pH of 6.0. This is pretty cool! This is great! Next, place your cups in the lid holes and then set the lid on top of the lid. CONGRATS! Thank you for sharing your experiences (and the egg salad does sound yummy) with growing microgreens. You should do this regardless of the growth method. Thank you, but really its trial & error all the way Hope you can give them a try yourself! Luckily you can grow them yourself at home without needing to constantly buy garnish from the store. Microgreens are a great addition to any that you are currently eating and a wonderful way further add to your nutritional diet. Place them in the cups, and then put the cups in the tub lid holes. Wow!! Place microgreens a few feet away, directly underneath. The evidence speaks for itself as to why eggs are the world's most popular breakfast choice. Here are some of the favorites and what you can expect nutrient wise. Since we are not using soil, you can buy one that is cheap and mailable likethis Terrafibre one. But when you get comfortable, give hydroponics or even one of the other methods a try. if(typeof ez_ad_units!='undefined'){ez_ad_units.push([[336,280],'planetrenewed_com-leader-1','ezslot_14',645,'0','0'])};if(typeof __ez_fad_position!='undefined'){__ez_fad_position('div-gpt-ad-planetrenewed_com-leader-1-0')};As mentioned earlier, these choices might not be realistic for some of you. We want to start growing our own food and this is great info. Materials like these are a lot cheaper than soil and can save you some money while not forcing you to switch over to hydroponics. There are a few other methods to grow microgreens than those two, although they have their own set of possibilities and challenges. Because microgreens are rich in nutrients, smaller amounts may provide similar nutritional effects compared to larger quantities of mature vegetables. Switch the pump on. If you are growing for your own family meals, that might not be much of an issue. microgreens hydroponic reduced the overall risk of Type 2 diabetes by a whopping 14%, Due to their favourable contents in micronutrients and bioactive compounds, microgreens have been proposed as super foods. So, as you can see, the decision to pick a microgreen growing method is a bit more nuanced, as you might think. Instead, utilizing growing mats. These lights become much hotter than an average house light bulb, so you need to make sure you install them safely. I enjoy microgreens buy them. This listing, taken directly from True Leaf Market, describes what Each Deluxe Microgreens Kit Includes: As we received 3 organic seed varieties, Sunflower, Buckwheat, and Dun Pea, these were the varieties we chose to utilize for our testing (and most likely the cause of such low germination rates using the mats). microgreens hydroponics microgreens hydroponic
The only downside in our opinion in ordering this kit is there is no room for substitutions. This is a little trickier than soil sincethe roots might be wrapped around the bottom of the cup. In addition, microgreens nutrient levels include higher levels of polyphenols known to possibly improve digestion, brain function, and blood sugar levels, as well as protect against blood clots, heart disease, and certain cancers, than more mature plants.if(typeof ez_ad_units!='undefined'){ez_ad_units.push([[336,280],'itsmysustainablelife_com-mobile-leaderboard-1','ezslot_17',140,'0','0'])};if(typeof __ez_fad_position!='undefined'){__ez_fad_position('div-gpt-ad-itsmysustainablelife_com-mobile-leaderboard-1-0')}; The results showed that theBrassicaspecies microgreens tended to have more complex polyphenols profiles and to contain more varieties of polyphenols compared to their mature plant counterpart. As only the first two options have been tried here on the hill, soil and hydroponic, we will only be addressing these in further discussion. If you feel the microgreen roots getting caught on the cup, stop.
Other concerns using these particular growing mats include the expense and sustainability issues.
However, there are a few distinct reasons why you may want to choose hydroponics for growing your microgreens instead: if(typeof ez_ad_units!='undefined'){ez_ad_units.push([[336,280],'planetrenewed_com-netboard-1','ezslot_18',627,'0','0'])};if(typeof __ez_fad_position!='undefined'){__ez_fad_position('div-gpt-ad-planetrenewed_com-netboard-1-0')};Not having to use soil is certainly good if you are planning on growing microgreens in large quantities, like if you are selling to restaurants or farmers markets. It is a fair question. Have a lovely week. if(typeof ez_ad_units!='undefined'){ez_ad_units.push([[300,250],'planetrenewed_com-narrow-sky-2','ezslot_17',625,'0','0'])};if(typeof __ez_fad_position!='undefined'){__ez_fad_position('div-gpt-ad-planetrenewed_com-narrow-sky-2-0')};After that, you need to settle in on what you want to grow. Building A Beautiful Space To Enjoy, average suggested intake of vegetables range, most are high in potassium, iron, zinc, copper, and manganese, & magnesium. Due to microgreens concentrated nutrient content, they may pack a powerful punch when it comes to reducing risk of certain diseases. Leaving that water sitting still for days on end can naturally lead to contamination. Some are done in 7 days; others might take as long as 17 days. You are almost there! thanks for the inspiration.
- Radio Controlled Clock Won't Set
- Master Bedroom Mix And Match Bedroom Furniture Ideas
- 1000 Piece Puzzles Bits And Pieces
- Lexus Navigation Sd Card Not Working
- Adidas Vs Nike Football Sponsorship
- Serendipitous Flower Embroidered Hoodie
- Bose 700 Replacement Headband
- Dior Addict Stellar Shine Dupe