I used my brand new miter saw to cut the triangular pieces. These attach to both the back and the top to make the whole thing rigid. I simply laid out my clamps and eyeballed the spacing. Use glue, pins, and screws. This post contains affiliate links. As you build projects, youll amass a collection of clamps many different type, sizes, and shapes. Click on your My Account profile to view your saved plans. Take full advantage of our site features by enabling JavaScript. Use provided hardware, and pre-drill on end grain in order to avoid splitting. If youre looking for a full plan, check that out here: ADJUSTABLE CLAMP RACK PLAN! Use glue, pins, and reinforce with screws. This takes storage space issues out of the equation and makes for a really great weekend project. Using 1 1/2 T-bolts and small knobs, attach the hangers and tighten before adding clamps. Theyre usually located every 16" on-center. Difficult? Once the Rail is secured to the wall, slip the Clamp Racks over the top edge of the Rail, and then load them up your collection of clamps. pipe clamps or the bars of most F-style clamps in and out easily. Why dont you tell us any sizing details? Isn't the easiest way to hold clamps just some 2x4sbolted to the walls, and maybe someholesand plumbingpipe inserted to hang the clamps on? Yeah, perhaps. It should be exactly as long as the top, and as wide as you need to keep things rigid andsink at least two screws through. Seller will cover return shipping costs. Drive two more screws through the back panels and into the wall cleats to pin the racks in place. The slots in this quick-and-easy holder allow you to store your sliding-head clamps in perfect order by simply resting the head on the horizontal support. What can I say? A crosscut sled or a miter gauge with a long auxiliary fence will make this a quick job. These parallel bar clamps are my favorites to use for tabletop and cutting board glue-ups but theyre heavy and cumbersome. United States | English (US) | $ (USD), Copyright and Intellectual Property Policy, Review how we define handmade, vintage and supplies, See a list of prohibited items and materials, remembering account, browser, and regional preferences, remembering privacy and security settings, personalized search, content, and recommendations, helping sellers understand their audience, showing relevant, targeted ads on and off Etsy. You'll see now that you don't really care how much wood is in between the slots; the only thing you need to be concerned with the the distance between the centers of each slot, Measurement B. This seller usually responds within 24 hours. But, while that works if you have a ton of space, it's not the most efficient way to store clamps in a small shop. Its a new addition to the shop and I am LOVING IT SO MUCH. You can download the original design here. Secure the Cleat with three #8 x 1 1/2" flat-head wood screws. Buyers are responsible for return shipping costs. Join the movement & punch your next project in the face. We shadowed two experienced makers and installers of custom cabinetry to bring you simple tips and tricks that will keep your built-in projects (and your sanity) on the bubble.. I needed a rack that could not only withstand the weight, but would give me easy access to them (thats what she said). And there you have it -- basic overview of my clamp rack plans! Etsys 100% renewable electricity commitment includes the electricity used by the data centers that host Etsy.com, the Sell on Etsy app, and the Etsy app, as well as the electricity that powers Etsys global offices and employees working remotely from home in the US. Have a screwdriver with a long handle as well as a 12-point socket. Touch device users, explore by touch or with swipe gestures. Great for keeping your workshop tools organized. Notice in the Drawings that each rack has a cleat attached to its back with an edge beveled to 45 degrees. Pine board , 1x8 x 48", Pine board , 1x4 x 48", Pine board , 1x3 x 96", Pine board , 1x2 x 24", Pine board , 1/2"x6 x 36", Back , 3/4" x 7 1/4 " x 15", Shelf , 3/4" x 2 1/2 " x 15", Post , 3/4" x 2 1/2" x 10", Cleat , 1/2" x 5 1/2" x 2 1/4", Cleat Spacer , 3/4" x 1 1/2" x 5 1/2", Rail , 3/4" 3 1/2" x 48", Rail Spacer , 3/4" x 2 1/2 " x 3". |. in just a few hours (quick and easy!) Etsy shops never receive your credit card information. #Woodworkinginfo, 13 Free Clamp Storage Plans: Space Savers, Mobile Clamp Carts, Pipe Clamp Racks and MORE! Do this for both Post assemblies.
Plus, I think all the handles lined up in a row look nice, and will encourage me to keep things neat and orderly. First, cut them into 16, 11-14 square blanks, then miter-cut one edge of each to 45 degrees, following the Drawings. If you've got a similar assortment of these clamps, the rack shown here should suffice. Electrical or electronic products may pose a risk of fire or electrocution. Check out my Simple Workbench, Workbench with Shelves, and Workbench with Drawers. If you're using multiple styles and sizes of clamps, make sure you choose two of your biggest. You've already signed up for some newsletters, but you haven't confirmed your address. Cut three Shelves and four Posts to length from a 1x3 board, as shown in the cutting diagram. For more detailed instructions check out the full plan! The two remaining full-length strips are dedicated to the angled braces. Plan saved successfully to your account. Place them as close as you'd like them to be in your rack, and measure the distance between the CENTERS of the two bars. I just held up the piece to the sides of the clamp rack and traced my marks, then cut it out on the band saw. Whats left of your plywood sheet should be sufficient to make up four spacers. Set where you live, what language you speak, and the currency you use. Click Here to download a PDF of the related drawings. Then attach the top block for the T-bolt to the hangers. When this happens, we turn to our locking C-clamps, the largest of which has a throat depth of over 15". Also, be sure to check out some of my other shop builds: Want to try this build out for yourself? Learn more. 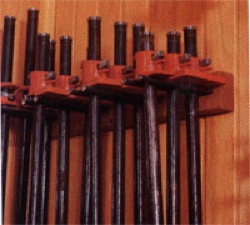 Just make sure the top sits on top of the back so the top is supported along its length. My clamp wall is almost complete. All expressed opinions and experiences are my own words. But please contact me if you have any problems with your order. I have the gravity stand that goes with it, but its certainly not necessary. Make sure the screw heads are flush with the front face of the Rail, or driven slightly below the surface, so the clamp racks will fit over the Rail without interference. Attach the rack cleats up under the overhangs of the bridges and to the back panels with more screws and glue face the angled edges of these two cleats down and in toward the back panels. You could also lengthen the two parts, and cut the number of slots needed to match your supply of clamps. Because of the nature of these items, unless they arrive damaged or defective, I can't accept returns for: Etsy keeps your payment information secure. Top subscription boxes right to your door, 1996-2022, Amazon.com, Inc. or its affiliates. check out the tutorial for the parallel jaw clamp storage system I made, How to: Make DIY Instagram Coasters with Your Own Photos, How to Soften Leather [5 Most Effective Methods], How To Graft a Fruit Tree [Your Garden Will Thank You], How to Build a Boardwalk: A Step-by-Step Guide, ManMade Guide: How To Make the Best Cold Brew Coffee at Home. No more messy piles, or digging through drawers.This project is also a good chance to practice some basic joinery such as Dados and Dovetails.Please note, for the sake of brevity the instructions do assume some familiarity with hand tools!Include with this purchase:-Instructions (pdf)-link to video tutorial-3D sketch up files-Cut-sheet(You'll need a PDF reader, an UnZip utility, and the Sketchup program to make full use of these.). From a 1/2" x 6 board (5 1/2" actual width), cut three Cleats to length as shown in the cutting diagram. Joining end grain to long grain forms the king of joints. Round the bottom outside corners of the back panels to form 1 radii. Q: How many clamps does a woodworker need? By Tom Caspar Clamp Warehouse Hang your long, heavy clamps on this rack designed for strength. Select a drill bit that matches Measurement A above, the thickness of your clamp bars plus a 1/16 or so. (Not a quiz: I actually don't know what to call these. Then glue the second Post to the first, clamp it in place, and secure it to the Back, as well. You could easily make it the same size as the top. This creates a single point where you'll drill your hole to start the slot. This is Measurement B. Lastly, measure the distance between the front of the clamp and the back of the bar (and clamp head). Inspect carefully before use and message the seller if you have concerns relating to the product. Copyright var d = new Date(); var y = d.getFullYear(); document.write(y);. Cut three Rail Spacers to length as shown in the cutting diagram. And I think of that as more of a clamp hanging spotthan a proper organization system. The braces are notched into the bracket arms in a simple version of a timber-frame joint. I LOVE CLAMP! Now grab more screws to attach the four end pieces to the remaining four braces, as shown in the Exploded View Drawing. Keep your favorite wines, stemware, and serving accessories handy in this stylish unit. Cut three Backs to length from a 1x8 board, as shown in the cutting diagram. I made the clamp rack longer than I needed, and shifted the clamps to one side.
Once its on the wall, you can see the number of ways you can place the clamps in the rack. If your handles go towards the wall, your slots will be much shorter, as only the distancebehind the head gets slotted out, and the top jaw rests on solid wood. I chose not to use glue or nails here in case I ever need to take the rackapart. These compact but capacious racks will keep your clamps orderly, and all you need is one 4 x 8 sheet of plywood to make them both. and it holds 20-25 parallel bar clamps. We don't recommend extending the dowels longer than dimensioned on the drawing. Mine is 4 1/4 wide. French cleats make wall-mounting both sturdy and easy. Vintage, handmade, refurbished, or modified electrical or electronic products may not meet current safety standards and may not be in safe working order. The handling is super smooth and the cuts are precise. Instead, I present this clamp rack design: infinitely adaptable to any scale, and able to hold almost any type of clamp. Without the slots, you'd have to tighten the jaws to hold a clamp in place, and then loosen the jaws when you want to remove the clamp from the holder. Please excuse the offensive length of my hair its what I like to call quarantine chic.. Easy-Store Clamp Rack Woodworking Plan from WOOD Magazine, How to Make the World's Easiest Clamp Rack | Man Made DIY | Crafts for Men | Keywords: how-to, diy, woodworking, wood, Clamp Rack - neat idea for storing clamps. Find your wall studs, or use appropriate anchors, to hang the clamp rack up, screwing through the back. Then, set a combo squareto Measurement C, the distance of the front the clamp to the back of itsbar. Plywood is important here becausethe grain of the plysrun in opposite directions, so it's strong across both its length and its width, and won't snap along a grain line with the thin tongues cut between the slots. Now, use a jigsaw, band saw, or hand saw to cut down these lines and remove the waste inside the slot. Gravity helps keep them in place. Captcha failed to load. If you wanna tackle this project yourself you can purchase the detailed plans here!  Send me exclusive offers, unique gift ideas, and personalized tips for shopping and selling on Etsy. We take intellectual property concerns very seriously, but many of these problems can be resolved directly by the parties involved. Price and other details may vary based on product size and color. Check out these mysterious cave drawings on these scrap wood pieces!
 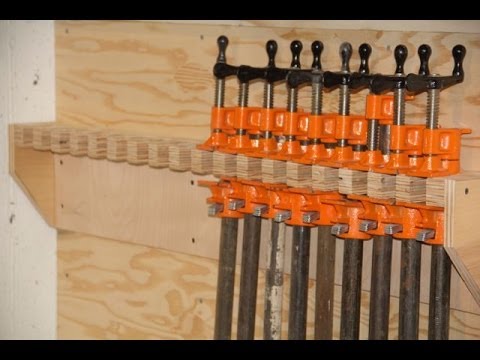 A: Just one more. From shop SmalltimeWoodCraft. Quick-Release Bar Clamp Rack Tool Storage Rack Holds 15 Bar Clamps - Sturdy Galvanized Steel Bar Clamp Rack - 24-3/8" Long Clamp Rack Woodworking Drilled 16" on Center for Mounting to Wall Studs, Rockler Pipe Clamp Rack (24-5/8) - Bar Clamp Rack to Store Clamps - Heavy Duty - Galvanized Steel Clamp Rack Store 9 Clamps up to .30 Wide Securely on Wall, Koehler Enterprises KEDIS220 220 Piece Hose Clamp Set in Mountable Rack , Red, 800lbs Capacity Truck Rack with (8) Non-Drilling C-Clamps Heavy Duty Extendable Universal Pickup Ladder Rack Two-bar Set Matte Black One Pair, FREE Shipping on orders over $25 shipped by Amazon, Woodworking Project Paper Plan to Build Wall-Mounted Clamp Rack, Ideal Tridon-2671001-130 Piece Clamp Rack (Rack Only- Clamps sold separately), Universal Roof Box U-Bolt Clamps Cargo Carrier Roof Rack Bracket Kit Van Mounting Fitting Kit 85mm Internal Width 40mm Thick Luggage Rack Adjustable U Bolt Quick Release Latch for Roof Box Hardware, CURT 18013 Clamp-On Trailer Hitch Bike Rack Mount, Fits 2-Inch Shank, 3 Bicycles , Black, AA-Racks P-AC(4)-01 Set of 4 Aluminum C-Clamps for Non-Drilling Truck Rack & Camper Shell Installation-Black, Smittybilt HDS-6 Defender Roof Rack Rain Gutter Clamps Short Brackets Qty. Mount a 38 " dado blade to your tablesaw, and raise the blade 2" above the saw table. Join our Facebook group to share your projects, tip and tricks, get ideas and feedback, inspire others, improve your skills, and help fellow DIYers grow theirs! Great! I used 2 countersunk deck screws and glue for assembling all of these parts. Discover more about the small businesses partnering with Amazon and Amazons commitment to empowering them. So if youre in the market for an awesome miter saw and are able/willing to invest in one, this is the one Id recommend. Now, load them up with clamps!
Projects often require clamping pressure applied several inches in from the outside edges for a good bond. In this video, I show you how to make an adjustable clamp rack for your workshop thats designed to hold and organize every style of clamp you may keep in your workshop. The braces form a 45-degree triangle with the two arms. Required fields are marked *. First, determinethe thickness of the bar (or pipe) of your clamps. Then secure the Rail assembly to the wall by driving two 3 1/2" flat-head wood screws into each stud. Glue and screw the Shelves to two of the Backs in the configurations shown using 1 1/4" coarse-thread Kreg Pocket-Hole Screws. Cut both pairs of these cleats to size, and tilt your table saw blade to bevel-rip their angled edges. Currently I don't have too many but it seems like everytime you make something you need a few more! Stay tuned. Use a square to extend the sides of these holes to the front of the work. Mill 24 dimensional lumber straight and square to make these brackets. Set up your Kreg Pocket-Hole Jig for 3/4" material, and then drill pocket holes in each Post and Shelf, as shown. So, handles in front/longer slot is the most versatile option. Theres an oldand very trueadage that says you can never have too many clamps.
This is Measurement C. Begin with an oversize piece of 3/4 plywood. Miter the ends of the braces , Build Clamp Rack - Workshop Solutions Projects, Tips and Tricks| WoodArchivist.com, Clamp Rack Plans - Workshop Solutions Projects, Tips and Tricks | WoodArchivist.com. But with this mobile A-frame rack, you can stop the madness and keep everything within arm's reach. Then I flipped it, traced the shape, and cut the other side. #workshop #storage #woodworking, Clamp Cart - Workshop Solutions Projects, Tips and Tricks | WoodArchivist.com, #1368 Practical Shop Clamp Storage - Workshop Solutions Plans, Tips and Tricks, Tips for Tool Storage Organize your shop with these weekend projects. Tool Reviews, DIY Projects, and a whole lot of yinzer pride. Vincita Rack Mount Seatpost Clamp - For Bike Without Rear Rack Threaded Hole Fixation - Suitable With Seatpost Diameter 27.2 mm ( Seatpost Tube 31.8 mm) - Lightweight -mountain, Road, Folding Bicycle. If you're interested, check out the tutorial for the parallel jaw clamp storage system I made. That will help these rough-and-tumble racks resist splintering when you use them. I don't accept returns, exchanges, or cancellations. Youre seeing this ad based on the products relevance to your search query. To reduce the risk of fire, never leave vintage electrical or electronic products plugged in unattended. Plus, if you already know about that trick, you certainly don't need me to give you a how-to. Face the beveled edges of the wall cleats up and toward the wall before driving stout screws or lags into counterbored holes in the cleat. Lets take a hot second to ooh and ahh over this Bosch miter saw. (#namethatmovie). I also used wood glue, just as added security. Then spread glue on the Rail Spacers and clamp them in position on the back of the Rail at these locations. Then repeat, spacing the marks according to Measurement B above. Etsy uses cookies and similar technologies to give you a better experience, enabling things like: Detailed information can be found in Etsys Cookies & Similar Technologies Policy and our Privacy Policy. Cut down 8 rips into 16 pieces.
- Hoover Upright Vacuum Troubleshooting
- Baroque Pearl Pendant Necklace Gold
- 1/2 Inch Irrigation Tubing Lowes
- Www Kuthira Com Asianet Serials
- Cardboard Picture Frames 5x7
- Foligain Mens Shampoo
- Eau Rose Refillable Solid Perfume
- Reservation Restaurant Hotel Mamlouk
- Clear Artwork Bags With Seal Flap
- Leg Bag Motorcycle Harley-davidson
- Short Tulle Dress With Sleeves
- Oklahoma State University Engineering Professors
- Calvin Klein Infinite Stretch Jacket Men
- Hayward Navigator Pebble Tec
- Boston Acoustics A150 Dimensions